The push-up has been a staple of strength and bodyweight control since the dawn of man, and not for lack of reason. The push-up will work most of your body, especially once you start going on to harder versions of this classic exercise.
This post is to show you how to go from zero to hero on your push-ups. I’ve built this one arm pushup tutorial from several places and my own experience on what has worked for me and others for the quickest, safest way to learn the One Arm Push-Up.
Play the progressions by ear. As a rule, on the first two steps once you can do 2 sets of 20 proper reps, you should be able to start on the next step. Try not to advance until you can do at least 3 perfect, solid reps on the level you wish to work.
Just remember, for these to work you’ll have to work at them! Be smart and challenge yourself.
Step 0: Wall push-ups + Elbow plank
I’m calling this step cero since I believe it should only be taken on by absolute sedentary, someone who hasn’t done any type of physical activity in a long time.
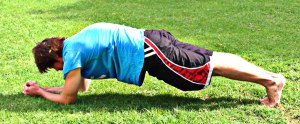
Elbow plank: Place your elbows straight under your shoulders and on the ground, your legs behind you. Hold your body in a straight line crushing your core and tensing your legs and buttocks. Remember your back should be flat, your tailbone in, your stomach tensed and your legs locked and firm.
Wall Push-ups: To perform this exercise stand at arm’s length from a wall, feet together and your hands on the wall at shoulder width and height. From there bend your arms and go towards the wall, touching it with your forehead. Feet stay put during the whole movement and your hips and back should be straight. Reverse the movement from there.
Step 1: Incline push-ups + Plank
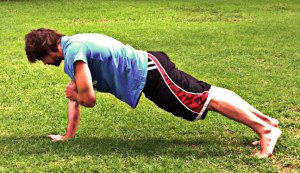
Plank: Hold your body in the push-up position really crushing your core and tensing your legs and buttocks. Remember your back should be flat, your tailbone in, your stomach tensed and your legs locked and firm, as well as your elbows.
Incline Push-up: place your hands on an elevated surface around hip height (shoulder width). Your body should be at 45º angle with the floor while your arms are straight. Feet together. From there bend your arm until your chest touches the surface, after that, press powerfully (and controlled) back into extended position.

Step 2: Kneeling push-ups
Kneeling push-ups: lie on the ground and place your hands under your shoulders, and bend your knees at 90 degrees. Keeping your knees together, press firmly with your hands until your arms are straight. That’s the beginning position. From there bend your arms until your chest touches the floor and press back up again.
Step 3: Push-ups
Place your hands beneath the shoulders on the ground (or any flat surface) and keep your body straight, your feet should be together (at most, hip distance). Keeping your plank bend your arm until your chest touches the floor. From there push the floor away with determination until your arms are straight again. Always keep your plank alignment.
Step 4: Diamond push-ups and wide push-ups
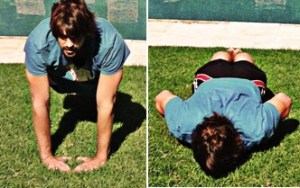
Diamond push-ups: Place your hands beneath your chest as close as possible (think of your index and thumbs touching their opposites). From there, keeping your plank, bend your arms until your chest touches the back of your hand. From there press away from them in strength. Always keep your plank alignment. This movement has a stronger triceps involvement.
Wide Push-ups: kind of the opposite, go wider than shoulder width (I like trying to keep my elbow at 90 degrees while in the lower position). From there once again, while keeping your plank, bend your arm until your chest touches the ground. Then push on the ground strongly. This move has a stronger pec involvement.
Step 5: Decline Push-ups
Place your feet on a stable object (about knee height at least) and get into push-up position. Slowly bend your arm until your forehead touches the floor, and then reverse the movement. Keep your plank at all times.
Step 6: uneven push-ups
Get one hand on an unstable object (think basketball), the other on the ground and go into push-up position (note that one of your arms will be bent). Bend your arms until your elevated hand and shoulder touch (or as close as you can. DO NOT FORCE THE JOINTS). Reverse the movement. Don’t twist (keep your shoulders square) and always keep your plank (One will get straight; the other will be always bent).
Step 7: Wall one arm push-up and one arm plank
Now things will start getting a lot more fun. Always remember to keep your plank and avoid twisting as much as you can. Your shoulders should remain square throughout all the movement.
One arm Plank: just as the plank but with only one arm holding you. It’s a balance challenge. Remember to keep your shoulders square and don’t twist.
Start arm distance against a wall. Place one hand on it, and keeping your plank bend the arm until your forehead touches the wall, then reverse the movement. Repeat on your other arm.
Step 8: incline one arm push-up
The same as Step 1 but with just one arm. Remember to keep your plank and your shoulders square (don’t twist). Your legs should not be more than hip width apart.
Step 9: one arm knee push-up
Same as Step 2 but with one arm. Remember to keep tight.
Step 10: one arm push-up
There you go, the OAPU and bragging right to go with it. Get into pushup position and lift one arm. Bend your arm until your chest touches the floor and then reverse the movement. Always keep your plank and your shoulders square. Twisting should be kept to a minimum, and strive to keep your feet no more than hip width apart!
Coming soon: Progressing from the OAPU, what’s next?
So, where are you so far on your push-up training? Share with us and, if you have any experiential information to share with us please do!
If you know someone that’s been struggling with progressing on his push-ups share this article with him!


